A sound analysis of a computer network begins by understanding what are the available tools to perform the task, how to pick the right one(s) for each step of the way, and last but not least, where to begin.
This is the last part of the LFCE (Linux Foundation Certified Engineer) series, here we will review some well-known tools to examine the performance and increase the security of a network, and what to do when things aren’t going as expected.

Introducing The Linux Foundation Certification Program
Please note that this list does not pretend to be comprehensive, so feel free to comment on this post using the form at the bottom if you would like to add another useful utility that we could be missing.
What Services are Running and Why?
One of the first things that a system administrator needs to know about each system is what services are running and why. With that information in hand, it is a wise decision to disable all those that are not strictly necessary and shun hosting too many servers in the same physical machine.
For example, you need to disable your FTP server if your network does not require one (there are more secure methods to share files over a network, by the way). In addition, you should avoid having a web server and a database server in the same system. If one component becomes compromised, the rest run the risk of getting compromised as well.
Investigating Socket Connections with ss
ss is used to dump socket statistics and shows information similar to netstat, though it can display more TCP and state information than other tools. In addition, it is listed in man netstat as replacement for netstat, which is obsolete.
However, in this article we will focus on the information related to network security only.
Example 1: Showing ALL TCP ports (sockets) that are open on our server
All services running on their default ports (i.e. http on 80, mysql on 3306) are indicated by their respective names. Others (obscured here for privacy reasons) are shown in their numeric form.

The first column shows the TCP state, while the second and third column display the amount of data that is currently queued for reception and transmission. The fourth and fifth columns show the source and destination sockets of each connection.
On a side note, you may want to check RFC 793 to refresh your memory about possible TCP states because you also need to check on the number and the state of open TCP connections in order to become aware of (D)DoS attacks.
Example 2: Displaying ALL active TCP connections with their timers

In the output above, you can see that there are 2 established SSH connections. If you notice the value of the second field of timer:, you will notice a value of 36 minutes in the first connection. That is the amount of time until the next keepalive probe will be sent.
Since it’s a connection that is being kept alive, you can safely assume that is an inactive connection and thus can kill the process after finding out its PID.
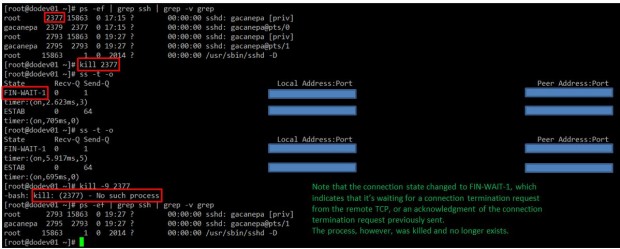
As for the second connection, you can see that it’s currently being used (as indicated by on).
Example 3: Filtering connections by socket
Suppose you want to filter TCP connections by socket. From the server’s point of view, you need to check for connections where the source port is 80.
Resulting in..

Protecting Against Port Scanning with NMAP
Port scanning is a common technique used by crackers to identify active hosts and open ports on a network. Once a vulnerability is discovered, it is exploited in order to gain access to the system.
A wise sysadmin needs to check how his or her systems are seen by outsiders, and make sure nothing is left to chance by auditing them frequently. That is called “defensive port scanning”.
Example 4: Displaying information about open ports
You can use the following command to scan which ports are open on your system or in a remote host:
The above command will scan the host for OS and version detection, port information, and traceroute (-A). Finally, -sS sends a TCP SYN scan, preventing nmap to complete the 3-way TCP handshake and thus typically leaving no logs on the target machine.
Before proceeding with the next example, please keep in mind that port scanning is not an illegal activity. What IS illegal is using the results for a malicious purpose.
For example, the output of the above command run against the main server of a local university returns the following (only part of the result is shown for sake of brevity):
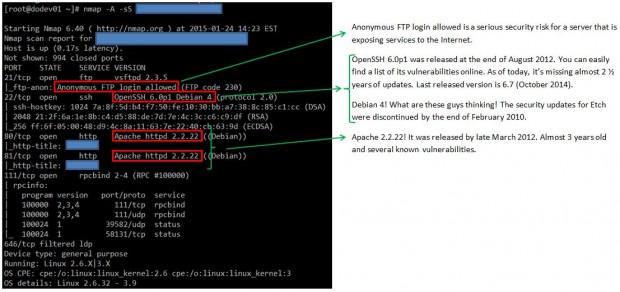
As you can see, we discovered several anomalies that we should do well to report to the system administrators at this local university.
This specific port scan operation provides all the information that can also be obtained by other commands, such as:
Example 5: Displaying information about a specific port in a local or remote system
Example 6: Showing traceroute to, and finding out version of services and OS type, hostname
Example 7: Scanning several ports or hosts simultaneously
You can also scan several ports (range) or subnets, as follows:
Note: That the above command scans ports 21, 22, and 80 on all hosts in that network segment.
You can check the man page for further details on how to perform other types of port scanning. Nmap is indeed a very powerful and versatile network mapper utility, and you should be very well acquainted with it in order to defend the systems you’re responsible for against attacks originated after a malicious port scan by outsiders.
Reporting Usage and Performance on Your Network
Although there are several available tools to analyze and troubleshoot network performance, two of them are very easy to learn and user friendly.
To install both of them on CentOS, you will need to enable the EPEL repository first.
1. nmon utility
nmon is a system tuner and benchmark tool. As such, it can display the CPU, memory, network, disks, file systems, NFS, top processes, and resources (Linux version & processors). Of course, we’re mainly interested in the network performance feature.
To install nmon, run the following command on your chosen distribution:
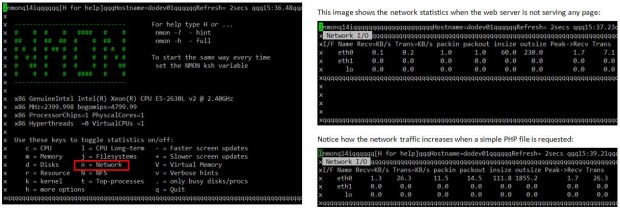
Make it a habit to look at the network traffic in real time to ensure that your system is capable of supporting normal loads and to watch out for unnecessary traffic or suspicious activity.
Vnstat Utility
vnstat is a console-based network traffic monitor that keeps a log of hourly (daily or monthly as well) network traffic for the selected interface(s).
After installing the package, you need to enable the monitoring daemon as follows:
Once you have installed and enabled vnstat, you can initialize the database to record traffic for eth0 (or other NIC) as follows:
As I have just installed vnstat in the machine that I’m using to write this article, I still haven’t gathered enough data to display usage statistics:

The vnstatd daemon will continue running in the background and collecting traffic data. Until it collects enough data to produce output, you can refer to the project’s web site to see what the traffic analysis looks like.
Transferring Files Securely Over the Network
If you need to ensure security while transferring or receiving files over a network, and specially if you need to perform that operation over the Internet, you will want to resort to 2 secure methods for file transfers (don’t even think about doing it over plain FTP!).
Example 8: Transferring files with scp (secure copy)
Use the -P flag if SSH on the remote hosts is listening on a port other than the default 22. The -p switch will preserve the permissions of local_file after the transfer, which will be made with the credentials of remote_user on remote_hosts. You will need to make sure that /absolute/path/to/remote/directory is writeable by this user.
Example 9: Receiving files with scp (secure copy)
You can also download files with scp from a remote host:
Or even between two remote hosts (in this case, copy the file myFile.txt from remote_host1 to remote_host2):
Don’t forget to use the -P switch if SSH is listening on a port other than the default 22.
You can read more about SCP commands.
Example 10: Sending and receiving files with SFTP
Unlike SCP, SFTP does not require previously knowing the location of the file that we want to download or send.
This is the basic syntax to connect to a remote host using SFTP:
Where XXXX represents the port where SSH is listening on host, which can be either a hostname or its corresponding IP address. You can disregard the -oPort flag if SSH is listening on its default port (22).
Once the connection is successful, you can issue the following commands to send or receive files:
In both cases, the -r switch is used to recursively receive or send files, respectively. In the first case, the -P option will also preserve the original file permissions.
To close the connection, simply type “exit” or “bye”. You can read more about sftp command.
Summing Up
You may want to complement what we have covered in this article with what we’ve already learned in other tutorials of this series, for example Part 8: How To Setup an Iptables Firewall.
If you know your systems well, you will be able to easily detect malicious or suspicious activity when the numbers show unusual activity without an apparent reason. You will also be able to plan ahead for network resources if you’re expecting a sudden increase in their use.


No comments:
Post a Comment