Requirements
- LEMP stack installed on Gentoo – https://www.tecmint.com/install-lemp-in-gentoo-linux/
Step 1: Enable FCGIWRAP on Gentoo LEMP
Fcgiwrap is a part of Nginx FastCGI Common Gateway Interface which process other dynamic scripting languages, like Perl or Bash or Ruby scripts, works by processing requests received from Nginx, through TCP or Unix Sockets, in an independently manner and returns the produced result back to Nginx, which, in term, will forward responses back to end clients.
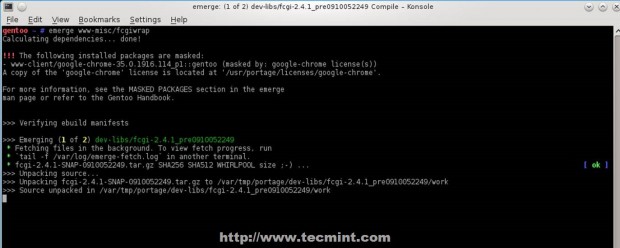
1. Let’s first start by installing FCcgiwrap process on Gentoo Linux using the following command.
2. By default Fcgiwrap package doesn’t provide any init scripts on Gentoo to manage the process. After the packages has been compiled and installed create the following init scripts that helps you to manage Fcgiwrap process using three approach: either launching the process using Unix Domain Sockets or using local TCP Sockets or using both at the same time.
Using TCP Socket Script
Create an init file on /etc/init.d/ path with the following file content.
Add the following file content.
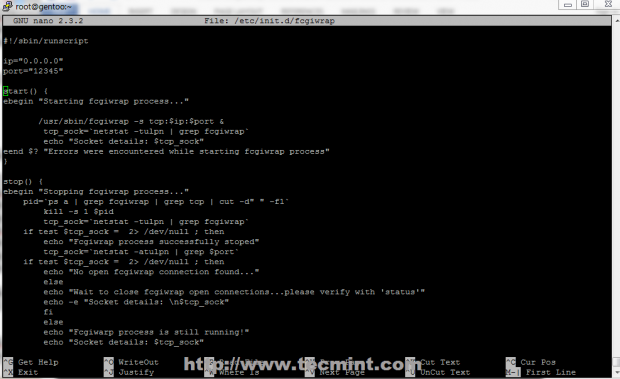
As you can see the script file holds two variable at the beginning, respectively ip and port. Change this variables with your own needs and make sure they don’t overlap with other services on your system, especially port variable – default here is 12345 – change accordingly.
Using 0.0.0.0 on IP variable enables the process to bind and listen on any IP (outside accessible if you don’t have a firewall ), but for security reasons you should change it to listen locally only, on 127.0.0.1, unless you have other reasons like remotely setup Fcgiwrap gateway on a different node for performance or load balancing.
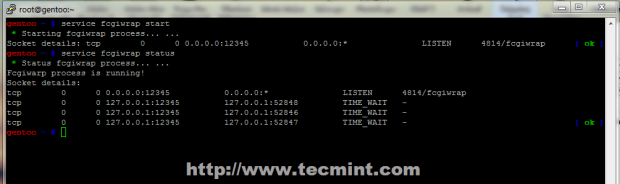
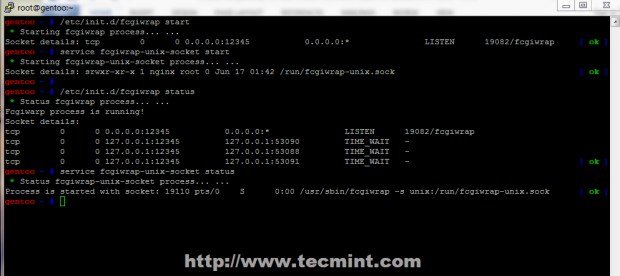
3. After the file is created, append execution permissions and manage the daemon process using start, stop or status switches. The status switch will show you relevant socket information such as IP-PORT pair it listens and if any active connection where initialized. Also, if the process has active connections in TIME_WAIT state you cannot restart it until all TCP connections close.
Using Unix Socket Script
As presented earlier Fcgiwrap can run simultaneously using both sockets, so will slightly change the name of the second script to fcgiwrap-unix-socket, to ensure that both can be started and run the same time.
Use the following file content for UNIX socket.

4. Again assure that this file is executable and use the same service switches: start, stop or status. I have set the default path for this socket on /run/fcgiwrap-unix.sock system path. Start the process and verify it using status switch or list /run directory content and locate the socket, or use ps -a | grep fcgiwrap command.
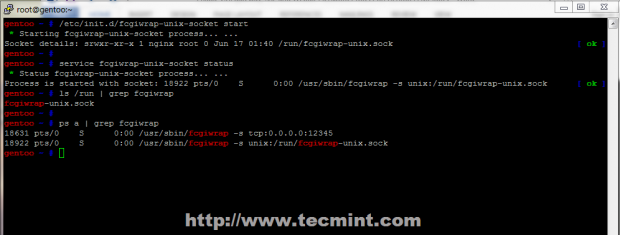
As previously mentioned Fcgiwrap can run with both TCP and UNIX sockets simultaneous, but if you don’t need external gateway connections stick to Unix Domain Socket only, because it uses interprocess communication, which is faster than communication over TCP loopback connections, and uses less TCP overhead.
Step 2: Enable CGI Scripts on Nginx
5. For Nginx to parse and run Perl or Bash scripts through Fast Common Gateway Interface, Virtual Hosts must be configured with Fcgiwrap definitions on root path or location statements.
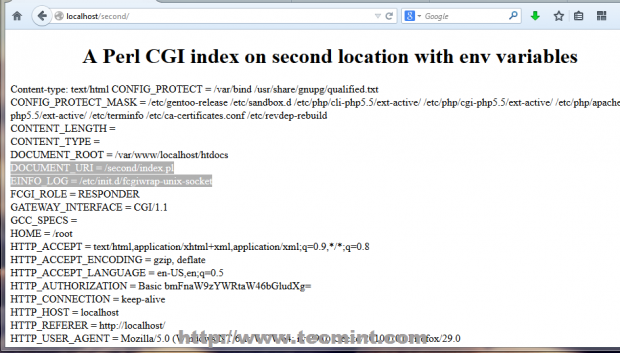
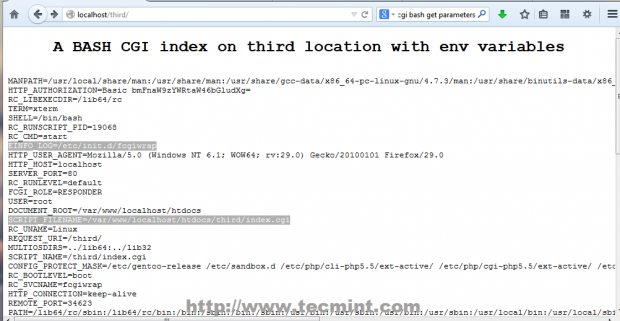
An example, is presented below (localhost), which activates Perl and CGI scripts on all files placed in root path (/var/www/localhost/htdocs/) with .pl and .cgi extension using Fcgiwrap TCP Sockets for default root document path, the second location using Unix Domain Sockets, with an index.pl file and the third location is using TCP sockets with an index.cgi file.
Place the following content, or just some parts of it, to your desired Virtual Host configuration file you want to activate dynamic Perl or Bash scripts with UNIX or TCP Sockets under different locations, by modifying fastcgi_pass argument statement.
Edit localhost.conf to look like in the template below.
6. After you finish editing Nginx localhost.conf, or your specific Virtual Host configuration file, move to your website default document root path, create those two folders to reflect your location statement, and create index files for every location with its specific extension.
Create index.pl file on second location with the following content.
Add this content to get environment variables.
Then create index.cgi file on third location with the following content.
Add this content to get environment variables.
7. When finish editing, make both files executable, restart Nginx server and make sure that both Fcgiwrap sockets are running.
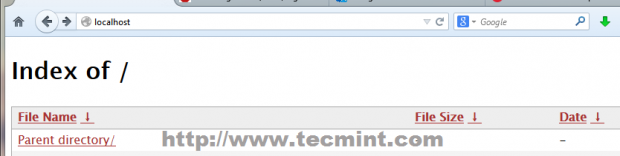
Next, redirect your local browser on following URL.
The result should appear as on below screenshots.
8. If everything is in place and correctly configured, enable both Fcgiwrap daemons to automatically start, after reboot by issuing the following commands (in case you have configured Nginx to use both CGI sockets).
Step 3: Activate Ruby support on Fcgiwrap
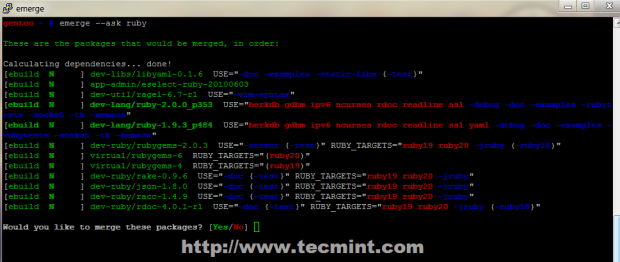
9. If you need to run dynamic Ruby scripts on Nginx FCGI you must install Ruby interpreter on Gentoo with the following command.
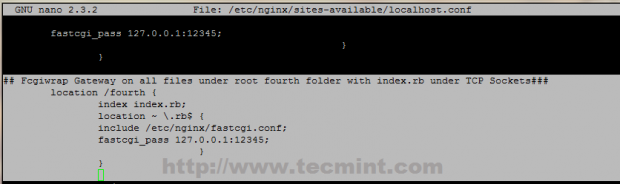
10. After the package has been compiled and installed, move to Nginx sites-available and edit localhost.conf file by appending the following statements before last curly bracket “ } ”, which activates support to run Ruby scripts on a fourth location under default document root path served by Nginx localhost.
Use the following Nginx directives.
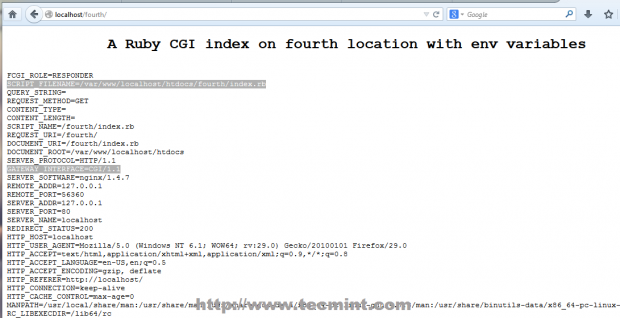
11. Now, to test configuration create the fourth directory under /var/www/localhost/htdocs path, create an executable Ruby index script with .rb extension and add the following content.
Ruby index.rb example.
12. After you add execution permissions on file, restart Nginx daemon to apply configurations.
Open your browser and navigate to the URL http://localhost/fourth/, which should present you the following content.
That’s it for now, you have configured Nginx to serve dynamic Perl, Ruby and Bash scripts on FastCGI Gateway, but, be aware that running this kind of interpreted scripts on Nginx CGI Gateway can be dangerous and impose seriously security risks on you server because they run using active shells under you system, but can expand static barrier imposed by static HTML, adding dynamic functionality to your


No comments:
Post a Comment