The Linux Foundation announced the LFCS (Linux Foundation Certified Sysadmin) certification, a new program that aims at helping individuals all over the world to get certified in basic to intermediate system administration tasks for Linux systems.
This includes supporting running systems and services, along with first-hand troubleshooting and analysis, and smart decision-making to escalate issues to engineering teams.
The series will be titled Preparation for the LFCS (Linux Foundation Certified Sysadmin) Parts 1 through 33 and cover the following topics:
| No. | Title |
|---|---|
| Part 1 | How to Use ‘Sed’ Command to Manipulate Files in Linux |
| Part 2 | How to Install and Use Vi/Vim in Linux |
| Part 3 | How to Compress Files & Directoires and Finding Files in Linux |
| Part 4 | Partitioning Storage Devices, Formatting Filesystems, and Configuring Swap Partition |
| Part 5 | Mount/Unmount Local and Network (Samba & NFS) Filesystems in Linux |
| Part 6 | Assembling Partitions as RAID Devices – Creating & Managing System Backups |
| Part 7 | Managing System Startup Process and Services (SysVinit, Systemd, and Upstart |
| Part 8 | How to Manage User & Groups, File Permissions and Sudo Access |
| Part 9 | Linux Package Management with Yum, RPM, Apt, Dpkg, Aptitude, and Zypper |
| Part 10 | Learning Basic Shell Scripting and Filesystem Troubleshooting |
| Part 11 | How to Manage and Create LVM Using vgcreate, lvcreate, and lvextend Commands |
| Part 12 | How to Explore Linux with Installed Help Documentations and Tools |
| Part 13 | How to Configure and Troubleshoot Grand Unified Bootloader (GRUB) |
| Part 14 | Monitor Linux Processes Resource Usage and Set Process Limits on a Per-User Basis |
| Part 15 | How to Set or Modify Kernel Runtime Parameters in Linux Systems |
| Part 16 | Implementing Mandatory Access Control with SELinux or AppArmor in Linux |
| Part 17 | How to Set Access Control Lists (ACLs) and Disk Quotas for Users and Groups |
| Part 18 | Installing Network Services and Configuring Automatic Startup at Boot |
| Part 19 | An Ultimate Guide to Setting Up FTP Server to Allow Anonymous Logins |
| Part 20 | Setup a Basic Recursive Caching DNS Server and Configure Zones for Domain |
| Part 21 | How to Install, Secure, and Performance Tuning of MariaDB Database Server |
| Part 22 | How to Install and Configure NFS Server for File System Sharing |
| Part 23 | How to Setup Apache with Name-Based Virtual Hosting with SSL Certificate |
| Part 24 | How To Setup an Iptables Firewall to Enable Remote Access to Services in Linux |
| Part 25 | How to Turn a Linux into a Router to Handle Traffic Statically and Dynamically |
| Part 26 | How to Setup Encrypted Filesystems and Swap Using Cryptsetup Tool |
| Part 27 | How to Monitor System Usage, Outages, and Troubleshoot Linux Servers |
| Part 28 | How to Setup a Network Repository to Install or Update Packages |
| Part 29 | How to Audit Network Performance, Security, and Troubleshooting |
| Part 30 | How to Install and Manage Virtual Machines and Containers |
| Part 31 | Learn the Basics of Git to Manage Projects Efficiently |
| Part 32 | A Beginner’s Guide to Configuring IPv4 and IPv6 Addresses in Linux |
| Part 33 | A Beginner’s Guide to Creating Network Bonding and Bridging in Ubuntu |
This post is Part 1 of a 33-tutorial series, which will cover the necessary domains and competencies that are required for the LFCS certification exam. That being said, fire up your terminal, and let’s start.
Processing Text Streams in Linux
Linux treats the input to and the output from programs as streams (or sequences) of characters. To begin understanding redirection and pipes, we must first understand the three most important types of I/O (Input and Output) streams, which are in fact special files (by convention in UNIX and Linux, data streams and peripherals, or device files, are also treated as ordinary files).
The difference between > (redirection operator) and | (pipeline operator) is that while the first connects a command with a file, the latter connects the output of a command with another command.
Since the redirection operator creates or overwrites files silently, we must use it with extreme caution, and never mistake it with a pipeline.
One advantage of pipes on Linux and UNIX systems is that there is no intermediate file involved with a pipe – the stdout of the first command is not written to a file and then read by the second command.
For the following practice exercises, we will use the poem “A happy child” (anonymous author).

Using sed Command
The name sed is short for stream editor. For those unfamiliar with the term, a stream editor is used to perform basic text transformations on an input stream (a file or input from a pipeline).
Change Lowercase to Uppercase in File
The most basic (and popular) usage of sed is the substitution of characters. We will begin by changing every occurrence of the lowercase y to UPPERCASE Y and redirecting the output to ahappychild2.txt.
The g flag indicates that sed should perform the substitution for all instances of term on every line of the file. If this flag is omitted, sed will replace only the first occurrence of the term on each line.
Sed Basic Syntax:
Our Example:

Search and Replace Word in File
Should you want to search for or replace a special character (such as /, \, &) you need to escape it, in the term or replacement strings, with a backward slash.
For example, we will substitute the word and for an ampersand. At the same time, we will replace the word I with You when the first one is found at the beginning of a line.
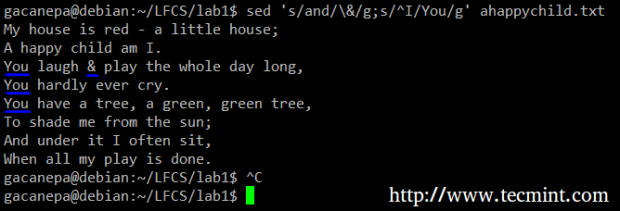
In the above command, a ^ (caret sign) is a well-known regular expression that is used to represent the beginning of a line.
As you can see, we can combine two or more substitution commands (and use regular expressions inside them) by separating them with a semicolon and enclosing the set inside single quotes.
Print Selected Lines from a File
Another use of sed is showing (or deleting) a chosen portion of a file. In the following example, we will display the first 5 lines of /var/log/messages from Jun 8.
Note that by default, sed prints every line. We can override this behavior with the -n option and then tell sed to print (indicated by p) only the part of the file (or the pipe) that matches the pattern (Jun 8 at the beginning of the line in the first case and lines 1 through 5 inclusive in the second case).
Finally, it can be useful while inspecting scripts or configuration files to inspect the code itself and leave out comments. The following sed one-liner deletes (d) blank lines or those starting with # (the | character indicates a boolean OR between the two regular expressions).

uniq Command
The uniq command allows us to report or remove duplicate lines in a file, writing to stdout by default. We must note that uniq does not detect repeated lines unless they are adjacent.
Thus, uniq is commonly used along with a preceding sort (which is used to sort lines of text files). By default, sort takes the first field (separated by spaces) as a key field. To specify a different key field, we need to use the -k option.
Uniq Command Examples
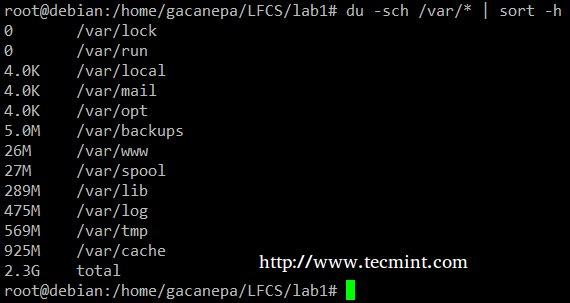
The du -sch /path/to/directory/* command returns the disk space usage per subdirectories and files within the specified directory in human-readable format (also shows a total per directory), and does not order the output by size, but by subdirectory and file name.
We can use the following command to sort by size.
You can count the number of events in a log by date by telling uniq to perform the comparison using the first 6 characters (-w 6) of each line (where the date is specified), and prefixing each output line by the number of occurrences (-c) with the following command.

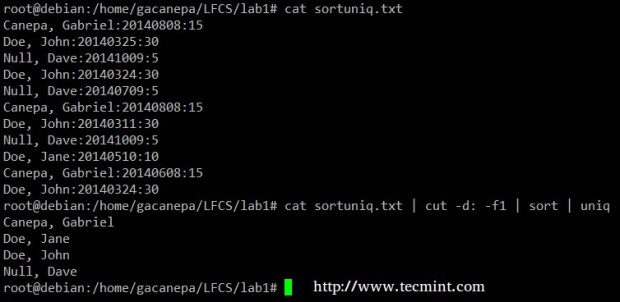
Finally, you can combine sort and uniq (as they usually are). Consider the following file with a list of donors, donation date, and amount. Suppose we want to know how many unique donors there are.
We will use the following cat command to cut the first field (fields are delimited by a colon), sort by name, and remove duplicate lines.
grep Command
The grep command searches text files or (command output) for the occurrence of a specified regular expression and outputs any line containing a match to standard output.
Grep Command Examples
Display the information from /etc/passwd for user gacanepa, ignoring case.

Show all the contents of /etc whose name begins with rc followed by any single number.

tr Command Usage
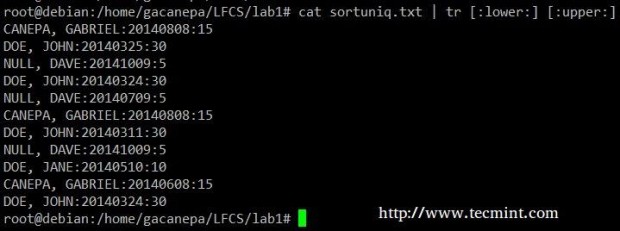
The tr command can be used to translate (change) or delete characters from stdin, and write the result to stdout.
Change all lowercase to uppercase in the sortuniq.txt file.
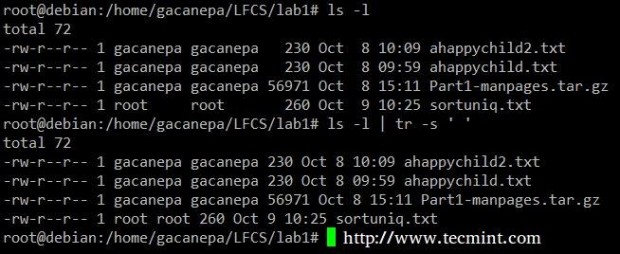
Squeeze the delimiter in the output of ls –l to only one space.
Cut Command Usage
The cut command extracts portions of input lines (from stdin or files) and displays the result on standard output, based on the number of bytes (-b option), characters (-c), or fields (-f).
In this last case (based on fields), the default field separator is a tab, but a different delimiter can be specified by using the -d option.
Cut Command Examples
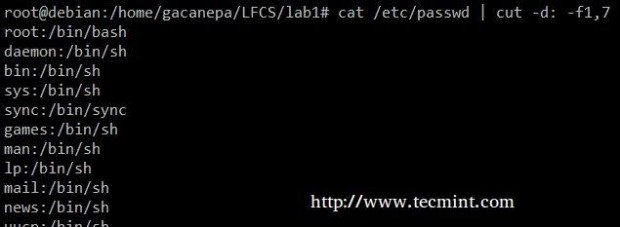
Extract the user accounts and the default shells assigned to them from /etc/passwd (the –d option allows us to specify the field delimiter and the –f switch indicates which field(s) will be extracted.
Summing up, we will create a text stream consisting of the first and third non-blank files of the output of the last command. We will use grep as a first filter to check for sessions of user gacanepa, then squeeze delimiters to only one space (tr -s ‘ ‘).
Next, we’ll extract the first and third fields with cut, and finally sort by the second field (IP addresses in this case) showing unique.
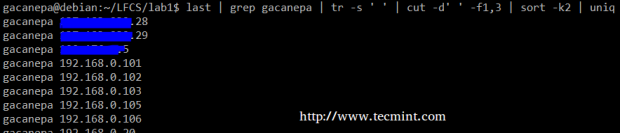
The above command shows how multiple commands and pipes can be combined so as to obtain filtered data according to our desires. Feel free to also run it by parts, to help you see the output that is pipelined from one command to the next (this can be a great learning experience, by the way!).


No comments:
Post a Comment