Archiving and Compression Tools for Linux
A file archiving tool groups a set of files into a single standalone file that we can back up to several types of media, transfer across a network, or send via email.
The most frequently used archiving utility in Linux is the tar command. When an archiving utility is used along with a compression tool, it allows to reduce the disk size that is needed to store the same files and information.
Linux tar Utility
tar bundles a group of files together into a single archive (commonly called a tar file or tarball). The name originally stood for tape archiver, but we must note that we can use this tool to archive data to any kind of writeable media (not only to tapes).
Tar is normally used with a compression tool such as gzip, bzip2, or xz to produce a compressed tarball.
The basic syntax of the tar command is as follows:
Where ... represents the expression used to specify which files should be acted upon.
Most Commonly Used Tar Commands
| Long option | Abbreviation | Description |
| –create | c | Creates a tar archive |
| –concatenate | A | Appends tar files to an archive |
| –append | r | Appends files to the end of an archive |
| –update | u | Appends files newer than copy in archive |
| –diff or –compare | d | Find differences between archive and file system |
| –file archive | f | Use archive file or device ARCHIVE |
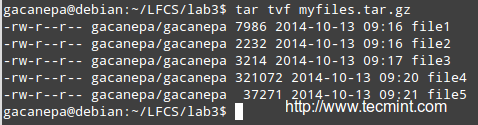
| –list | t | Lists the contents of a tarball |
| –extract or –get | x | Extracts files from an archive |
Normally Used tar Operation Modifiers
| Long option | Abbreviation | Description |
| –directory dir | C | Changes to directory dir before performing operations |
| –same-permissions | p | Preserves original permissions |
| –verbose | v | Lists all files read or extracted. When this flag is used along with –list, the file sizes, ownership, and time stamps are displayed. |
| –verify | W | Verifies the archive after writing it |
| –exclude file | — | Excludes files from the archive |
| –exclude=pattern | X | Exclude files, given as a PATTERN |
| –gzip or –gunzip | z | Processes an archive through Gzip |
| –bzip2 | j | Processes an archive through bzip2 |
| –xz | J | Processes an archive through xz |
Linux Gzip, Bzip2, and Xz Utilities
Gzip is the oldest compression tool and provides the least compression, while bzip2 provides improved compression. In addition, xz is the newest but (usually) provides the best compression.
The advantages of best compression come at a price: the time it takes to complete the operation, and the system resources used during the process.
Normally, tar files compressed with these utilities have .gz, .bz2, or .xz extensions, respectively. In the following examples, we will be using these files: file1, file2, file3, file4, and file5.
Compressing Files with gzip, bzip2 and xz
Group all the files in the current working directory and compress the resulting bundle with gzip, bzip2, and xz (please note the use of a regular expression to specify which files should be included in the bundle – this is to prevent the archiving tool to group the tarballs created in previous steps).

List Contents and Updating/Appending Files Tar Archive
List the contents of a tarball and display the same information as a long directory listing. Note that update or append operations cannot be applied to compressed files directly.
Decompress Tar Files
If you need to update or append a file to a compressed tarball, you need to uncompress the tar file and update/append to it, then compress it again.
Run any of the following commands:
Delete or Add Files to Tar Archive
and
Finally,
and compare the modification date and time of file4 with the same information as shown earlier.
Exclude Files from Backups
Suppose you want to perform a backup of the user’s home directories. A good sysadmin practice would be (may also be specified by company policies) to exclude all video and audio files from backups.
Maybe your first approach would be to exclude from the backup all files with an .mp3 or .mp4 extension (or other extensions). What if you have a clever user who can change the extension to .txt or .bkp, your approach won’t do you much good.
In order to detect an audio or video file, you need to check its file type with a file. The following shell script will do the job.

Restore Backup with Tar Preserving Permissions
You can then restore the backup to the original user’s home directory (user_restore in this example), preserving permissions, with the following command.

Using Find Command to Search for Files
The find command is used to search recursively through directory trees for files or directories that match certain characteristics, and can then either print the matching files or directories or perform other operations on the matches.
Normally, we will search by name, owner, group, type, permissions, date, and size.
The basic syntax of the find command is as follows:
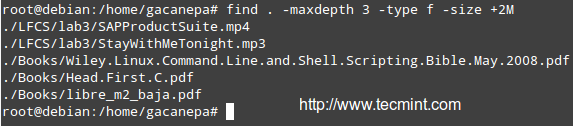
Finding Files Recursively According to Size
Find all files (-f) in the current directory (.) and 2 subdirectories below (-maxdepth 3 includes the current working directory and 2 levels down) whose size (-size) is greater than 2 MB.
Finding and Deleting Files That Match Certain Criteria
Files with 777 permissions are sometimes considered an open door to external attackers. Either way, it is not safe to let anyone do anything with files. We will take a rather aggressive approach and delete them! (‘{}‘ + is used to “collect” the results of the search).

Finding Files Based on Timestamps
Search for configuration files in /etc that have been accessed (-atime) or modified (-mtime) more (+180) or less (-180) than 6 months ago or exactly 6 months ago (180).
Modify the following command as per the example below:

Set File Permissions and Basic Attributes
The first 10 characters in the output of ls -l are the file attributes. The first of these characters is used to indicate the file type:
-: a regular file-d: a directory-l: a symbolic link-c: a character device (which treats data as a stream of bytes, i.e. a terminal)-b: a block device (which handles data in blocks, i.e. storage devices)
The next nine characters of the file attributes are called the file mode and represent the read (r), write (w), and execute (x) permissions of the file’s owner, the file’s group owner, and the rest of the users (commonly referred to as “the world”).
Whereas the read permission on a file allows the same to be opened and read, the same permission on a directory allows its contents to be listed if the execute permission is also set. In addition, the execute permission in a file allows it to be handled as a program and run, while in a directory it allows the same to be cd’ed into it.
File permissions are changed with the chmod command, whose basic syntax is as follows:
Where new_mode is either an octal number or an expression that specifies the new permissions.
The octal number can be converted from its binary equivalent, which is calculated from the desired file permissions for the owner, the group, and the world, as follows:
The presence of certain permission equals a power of 2 (r=22, w=21, x=20), while its absence equates to 0. For example:

To set the file’s permissions as above in octal form, type:
You can also set a file’s mode using an expression that indicates the owner’s rights with the letter u, the group owner’s rights with the letter g, and the rest with o.
All of these “individuals” can be represented at the same time with the letter a. Permissions are granted (or revoked) with the + or - signs, respectively.
Remove Execute Permission On a Script to All Users
As we explained earlier, we can revoke a certain permission by prepending it with the minus sign and indicating whether it needs to be revoked for the owner, the group owner, or all users. The one-liner below can be interpreted as follows: Change mode for all (a) users, revoke (-) execute permission (x).
Granting read, write, and execute permissions for a file to the owner and group owner, and read permissions for the world.
When we use a 3-digit octal number to set permissions for a file, the first digit indicates the permissions for the owner, the second digit for the group owner and the third digit for everyone else:
- Owner: (r=22 + w=21 + x=20 = 7)
- Group owner: (r=22 + w=21 + x=20 = 7)
- World: (r=22 + w=0 + x=0 = 4),
In time, and with practice, you will be able to decide which method to change a file mode works best for you in each case. A long directory listing also shows the file’s owner and its group owner (which serve as a rudimentary yet effective access control to files in a system):

File ownership is changed with the chown command. The owner and the group owner can be changed at the same time or separately. Its basic syntax is as follows:
Where at least a user or group needs to be present.
Chown Command Examples
Changing the owner of a file to a certain user.
Changing the owner and group of a file to a specific user:group pair.
Changing only the group owner of a file to a certain group. Note the colon before the group’s name.


No comments:
Post a Comment