Creating Physical Volumes, Volume Groups, and Logical Volumes
To create physical volumes on top of /dev/sdb, /dev/sdc, and /dev/sdd, do:
You can list the newly created PVs with:
and get detailed information about each PV with:
(where X is b, c, or d)
If you omit /dev/sdX as parameter, you will get information about all the PVs.
To create a volume group named vg00 using /dev/sdb and /dev/sdc (we will save /dev/sdd for later to illustrate the possibility of adding other devices to expand storage capacity when needed):
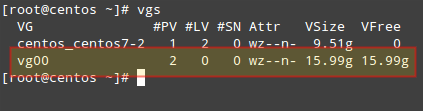
As it was the case with physical volumes, you can also view information about this volume group by issuing:
Since vg00 is formed with two 8 GB disks, it will appear as a single 16 GB drive:
When it comes to creating logical volumes, the distribution of space must take into consideration both current and future needs. It is considered good practice to name each logical volume according to its intended use.
For example, let’s create two LVs named vol_projects (10 GB) and vol_backups (remaining space), which we can use later to store project documentation and system backups, respectively.
The -n option is used to indicate a name for the LV, whereas -L sets a fixed size and -l (lowercase L) is used to indicate a percentage of the remaining space in the container VG.
As before, you can view the list of LVs and basic information with:
and detailed information with
To view information about a single LV, use lvdisplay with the VG and LV as parameters, as follows:

In the image above we can see that the LVs were created as storage devices (refer to the LV Path line). Before each logical volume can be used, we need to create a filesystem on top of it.
We’ll use ext4 as an example here since it allows us both to increase and reduce the size of each LV (as opposed to xfs that only allows to increase the size):
In the next section we will explain how to resize logical volumes and add extra physical storage space when the need arises to do so.
Resizing Logical Volumes and Extending Volume Groups
Now picture the following scenario. You are starting to run out of space in vol_backups, while you have plenty of space available in vol_projects. Due to the nature of LVM, we can easily reduce the size of the latter (say 2.5 GB) and allocate it for the former, while resizing each filesystem at the same time.
Fortunately, this is as easy as doing:

It is important to include the minus (-) or plus (+) signs while resizing a logical volume. Otherwise, you’re setting a fixed size for the LV instead of resizing it.
It can happen that you arrive at a point when resizing logical volumes cannot solve your storage needs anymore and you need to buy an extra storage device. Keeping it simple, you will need another disk. We are going to simulate this situation by adding the remaining PV from our initial setup (/dev/sdd).
To add /dev/sdd to vg00, do
If you run vgdisplay vg00 before and after the previous command, you will see the increase in the size of the VG:
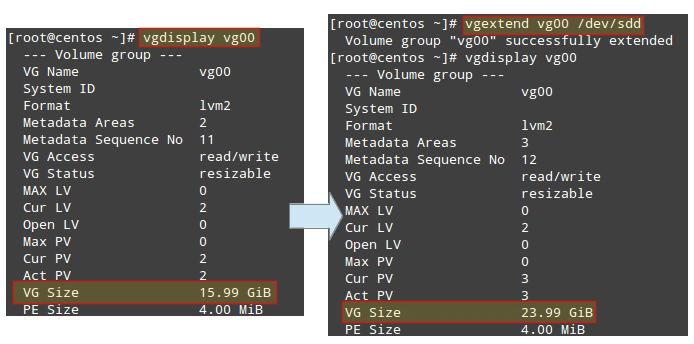
Now you can use the newly added space to resize the existing LVs according to your needs, or to create additional ones as needed.
Mounting Logical Volumes on Boot and on Demand
Of course there would be no point in creating logical volumes if we are not going to actually use them! To better identify a logical volume we will need to find out what its UUID (a non-changing attribute that uniquely identifies a formatted storage device) is.
To do that, use blkid followed by the path to each device:

Create mount points for each LV:
and insert the corresponding entries in /etc/fstab (make sure to use the UUIDs obtained before):
Then save the changes and mount the LVs:

When it comes to actually using the LVs, you will need to assign proper ugo+rwx permissions as explained in Part 8 – Manage Users and Groups in Linux of this series.


No comments:
Post a Comment