A Linux Foundation Certified Engineer (LFCE) is trained to set up, configure, manage, and troubleshoot network services in Linux systems, and is answerable for the design and implementation of system architecture and solving everyday related issues.

Introducing The Linux Foundation Certification Program (LFCE).
In Part 1 of this series we explained how to install a NFS (Network File System) server, and set the service to start automatically on boot. If you haven’t already done so, please refer to that article and follow the outlined steps before proceeding.
- Installing Network Services and Configuring Automatic Startup at Boot – Part 1
I will now show you how to properly configure your NFSv4 server (without authentication security) so that you can set up network shares to use in Linux clients as if those file systems were installed locally. Note that you can use LDAP or NIS for authentication purposes, but both options are out of the scope of the LFCE certification.
Configuring a NFSv4 server
Once the NFS server is up and running, we will focus our attention on:
- specifying and configuring the local directories that we want to share over the network, and
- mounting those network shares in clients automatically, either through the /etc/fstab file or the automount kernel-based utility (autofs).
We will explain later when to choose one method or the other.
Before we being, we need to make sure that the idmapd daemon is running and configured. This service performs the mapping of NFSv4 names (user@mydomain) to user and group IDs, and is required to implement a NFSv4 server.
Edit /etc/default/nfs-common to enable idmapd.
And edit /etc/idmapd.conf with your local domain name (the default is the FQDN of the host).
Then start idmapd.
Exporting Network Shares
The /etc/exports file contains the main configuration directives for our NFS server, defines the file systems that will be exported to remote hosts and specifies the available options. In this file, each network share is indicated using a separate line, which has the following structure by default:
Where /filesystem/to/export is the absolute path to the exported file system, whereas client1 (up to clientN) represents the specific client (hostname or IP address) or network (wildcards are allowed) to which the share is being exported. Finally, options is a list of comma-separated values (options) that are taken into account while exporting the share, respectively. Please note that there are no spaces between each hostname and the parentheses it precedes.
Here is a list of the most-frequent options and their respective description:
- ro (short for read-only): Remote clients can mount the exported file systems with read permissions only.
- rw (short for read-write): Allows remote hosts to make write changes in the exported file systems.
- wdelay (short for write delay): The NFS server delays committing changes to disk if it suspects another related write request is imminent. However, if the NFS server receives multiple small unrelated requests, this option will reduce performance, so the no_wdelay option can be used to turn it off.
- sync: The NFS server replies to requests only after changes have been committed to permanent storage (i.e., the hard disk). Its opposite, the async option, may increase performance but at the cost of data loss or corruption after an unclean server restart.
- root_squash: Prevents remote root users from having superuser privileges in the server and assigns them the user ID for user nobody. If you want to “squash” all users (and not just root), you can use the all_squash option.
- anonuid / anongid: Explicitly sets the UID and GID of the anonymous account (nobody).
- subtree_check: If only a subdirectory of a file system is exported, this option verifies that a requested file is located in that exported subdirectory. On the other hand, if the entire file system is exported, disabling this option with no_subtree_check will speed up transfers. The default option nowadays is no_subtree_check as subtree checking tends to cause more problems than it is worth, according to man 5 exports.
- fsid=0 | root (zero or root): Specifies that the specified file system is the root of multiple exported directories (only applies in NFSv4).
In this article we will use the directories /NFS-SHARE and /NFS-SHARE/mydir on 192.168.0.10 (NFS server) as our test file systems.
We can always list the available network shares in a NFS server using the following command:
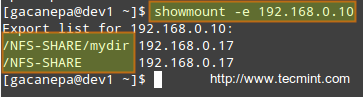
In the output above, we can see that the /NFS-SHARE and /NFS-SHARE/mydir shares on 192.168.0.10 have been exported to client with IP address 192.168.0.17.
Our initial configuration (refer to the /etc/exports directory on your NFS server) for the exported directory is as follows:
After editing the configuration file, we must restart the NFS service:
Mounting exported network shares using autofs
You may want to refer to Part 5 of the LFCS series (“How to Mount/Unmount Local and Network (Samba & NFS) Filesystems in Linux”) for details on mounting remote NFS shares on-demand using the mount command or permanently through the /etc/fstab file.
The downside of mounting a network file system using these methods is that the system must allocate the necessary resources to keep the share mounted at all times, or at least until we decide to unmount them manually. An alternative is to mount the desired file system on-demand automatically (without using the mount command) through autofs, which can mount file systems when they are used and unmount them after a period of inactivity.
Autofs reads /etc/auto.master, which has the following format:
Where [map file] is used to indicate multiple mount points within [mount point].
This master map file (/etc/auto.master) is then used to determine which mount points are defined, and then starts an automount process with the specified parameters for each mount point.
Mounting exported NFS shares using autofs
Edit your /etc/auto.master as follows:
and create a map file named /etc/auto.nfs-share with the following contents:
Note that the first field in /etc/auto.nfs-share is the name of a subdirectory inside /media/nfs. Each subdirectory is created dynamically by autofs.
Now, restart the autofs service:
and finally, to enable autofs to start on boot, run the following command:
Examining mounted file systems after starting the autofs daemon
When we restart autofs, the mount command shows us that the map file (/etc/auto.nfs-share) is mounted on the specified directory in /etc/auto.master:
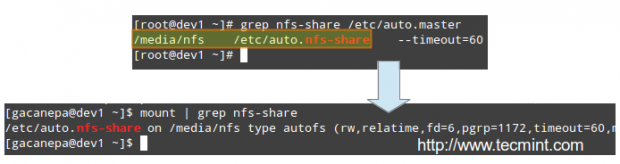
Please note that no directories have actually been mounted yet, but will be automatically when we try to access the shares specified in /etc/auto.nfs-share:

As we can see, the autofs service “mounts” the map file, so to speak, but waits until a request is made to the file systems to actually mount them.
Performing write tests in exported file systems
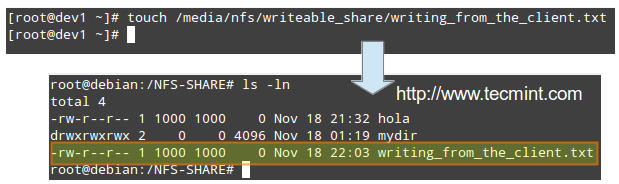
The anonuid and anongid options, along with the root_squash as set in the first share, allow us to map requests performed by the root user in the client to a local account in the server.
In other words, when root in the client creates a file in that exported directory, its ownership will be automatically mapped to the user account with UID and GID = 1000, provided that such account exists on the server:
Conclusion
I hope you were able to successfully setup and configure a NFS server fit for your environment using this article as a guide. You may also want to refer to the relevant man pages for further help (man exports and man idmapd.conf, for example).
Feel free to experiment with other options and test cases as outlined earlier and do not hesitate to use the form below to send your comments, suggestions, or questions. We will be glad to hear from you.


No comments:
Post a Comment