Introduction
MySQL is an open-source relational database management system (RDBMS) widely used for web applications and services. When deploying MySQL across multiple servers or environments, automation becomes essential for consistency, repeatability, and scalability. This is where Ansible, an automation tool, comes in handy.
In this blog post, we will walk you through the process of installing MySQL 8.4 on a CentOS 9 server using Ansible roles. By using Ansible roles, you can organize your playbooks better, reuse code, and easily deploy MySQL on multiple servers. Whether you’re managing a single server or thousands, Ansible makes it easy to automate server configuration and application installation.
Let’s explore how you can use Ansible roles to automate the process of installing MySQL 8.4 on CentOS 9.
Why Use Ansible for Installing MySQL 8.4? |
Ansible is an open-source IT automation tool that simplifies tasks like software installation, system configuration, and application deployment. It enables you to:
| Benefit | Description |
|---|---|
| Automate repetitive tasks | Installing MySQL manually on multiple servers can be time-consuming and prone to errors. Ansible helps streamline this process. |
| Ensure consistency | Ansible playbooks ensure that the installation steps are identical across all servers, ensuring that MySQL is installed and configured consistently. |
| Manage large infrastructures | Whether you’re deploying on a few servers or hundreds, Ansible’s scalability helps manage large environments. |
| Reduce human errors | By automating the installation and configuration process, you reduce the likelihood of misconfiguration. |
Using Ansible roles allows for modularity and reusability. Roles help break down complex tasks into smaller, manageable components, making it easier to maintain and scale your playbooks.
For this demonstration, we’ve configured our CentOS 9 stream instance as follows:
| Hostname | RAM | Cores | OS |
| ansible.dev.naijalabs.net (management or control node) | 4 | 2 | Red Hat Enterprise Linux release 9.5 (Plow) |
| mysql-db.dev.naijalabs.net (target server or node) | IP: 192.168.1.219 | 4 | 2 | Red Hat Enterprise Linux release 9.5 (Plow) |
Prerequisites for Installing MySQL 8.4 on CentOS 9
Before we start installing MySQL 8.4 using Ansible, ensure the following prerequisites are met:
CentOS 9 installed on the target servers.
Ansible installed on the local machine (or control node). If not installed, you can install Ansible using the following command:
sudo dnf install ansible -ySSH access to the remote servers where you plan to install MySQL.
Sudo privileges on the target servers to install packages and configure MySQL.
Inventory file defining the list of target servers in Ansible.
To check the version running on your control node, run the following command:
ansible --versionansible [core 2.14.18]
config file = /etc/ansible/ansible.cfg
configured module search path = ['/home/admin/.ansible/plugins/modules', '/usr/share/ansible/plugins/modules']
ansible python module location = /usr/lib/python3.9/site-packages/ansible
ansible collection location = /home/admin/.ansible/collections:/usr/share/ansible/collections
executable location = /usr/bin/ansible
python version = 3.9.21 (main, Dec 4 2024, 00:00:00) [GCC 11.5.0 20240719 (Red Hat 11.5.0-2)] (/usr/bin/python3)
jinja version = 3.1.2
libyaml = TrueOverview of Ansible Roles
Ansible roles are a way to organize tasks, handlers, variables, templates, and files into reusable components. Roles allow you to encapsulate specific configurations, making it easier to apply consistent settings to multiple servers.
For installing MySQL 8.4 on CentOS 9, we’ll create a custom Ansible role that contains:
- Tasks for installing MySQL.
- Variables for configuring MySQL.
- Handlers for restarting MySQL after installation.
- Files and templates for configuration files.
This structure helps ensure that your MySQL installation can be applied repeatedly and consistently.
Step 1: Installing MySQL 8.4 Using Ansible Role
Creating the MySQL Role |
To start, we need to create an Ansible role for installing MySQL 8.4. Ansible roles are created within the roles/ directory of your project. Run the following commands to create a mysql-84-install directory, navigate to it, and create a new role:
mkdir -p mysql-84-install && cd mysql-84-install && ansible-galaxy init mysql_install- Role mysql_install was created successfullyThis command generates the default structure for the MySQL installation role. The structure will look like this:
.
└── mysql_install
    ├── defaults
    │   └── main.yml
    ├── files
    ├── handlers
    │   └── main.yml
    ├── meta
    │   └── main.yml
    ├── README.md
    ├── tasks
    │   └── main.yml
    ├── templates
    ├── tests
    │   ├── inventory
    │   └── test.yml
    └── vars
        └── main.yml

9 directories, 8 files
Define your default variables |
The defaults/main.yml file in an Ansible role defines the default values for variables that can be overridden by the user, ensuring consistent configuration across tasks. Using your preferred text editor, open the mysql_install/defaults/main.yml file.
vim mysql_install/defaults/main.ymlAdd the following content (then, save and quit the file):
---
# defaults file for mysql_install

# Define MySQL Database variables
mysql_hostname: "127.0.0.1"
mysql_port:     "3306"
mysql_database: "my_database"
mysql_username: "my_user"Securing your passwords |
Sensitive data, such as passwords, should be stored in an encrypted vault file (e.g., secrets.yml), not in plaintext within vars/main.yml or defaults/main.yml. Use vars_files in the playbook to reference the encrypted vault, and always protect the vault password, ensuring it’s not committed to version control.
Here’s how you do it. First, run the following command to create the secrets.yml file.
ansible-vault create mysql_install/vars/secrets.ymlNew Vault password:
Confirm New Vault password:When creating an encrypted vault file, you will be prompted to enter and confirm a password to secure access. Ensure that all sensitive variables, such as the MySQL user and root passwords, are included in the vault file to be referenced during playbook execution (replace with a strong, preferably 12-character+ password).
mysql_root_password: "j/ip{,uf7/oT"
mysql_user_password: "n#@xPHV4s@ve"Save and quit the file. Now, store the password used to encrypt the secrets.yml (vault file) as plain text in a file we’re calling vaultpass.
vim .vaultpassused-to-crack@mysql_#passReplace used-to-crack@mysql_#pass with your actual vault file password. Again, save and quit file.
Setting Up the MySQL Repository |
Next, we need to add the MySQL repository to CentOS 9. To do this, we will modify the tasks/main.yml file inside the mysql_install role.
Here’s how you would add the MySQL 8.4 repository:
vim mysql_install/tasks/main.yml---
# tasks file for mysql_install
- name: Download and install the MySQL repository package
shell: |
sudo dnf install -y https://dev.mysql.com/get/mysql84-community-release-el9-1.noarch.rpm
sudo dnf install -y mysql-community-server mysql-community-devel
- name: Install python3-PyMySQL
dnf:
name: python3-PyMySQL
state: presentThis snippet downloads and installs the MySQL 8.4 repository, enabling us to install MySQL 8.4 from the official MySQL repository.
Installing MySQL 8.4 |
Next, in the same tasks/main.yml file, you will define the task to install MySQL 8.4:
- name: Install MySQL 8.4
dnf:
  name: mysql-community-server
state: presentInclude the following tasks to extract the temporary password from the log file and update root password with the one you set in your vault file.
- name: Start MySQL service
  service:
    name: mysqld
    state: started
    enabled: yes

- name: Get temporary root password from log
  command: "sudo grep 'temporary password' /var/log/mysqld.log"
  register: temp_root_password

- name: Extract the temporary password using regex
  set_fact:
    temp_password: "{{ (temp_root_password.stdout | regex_search('generated for root@localhost: (.+)', '\\1'))[0] }}"

- name: Update MySQL root Password
  shell: |
    mysql -u root -p"{{ temp_password }}" --connect-expired-password -e "ALTER USER 'root'@'localhost' IDENTIFIED BY '{{ mysql_password }}';"
when: my_cnf_file.stat.exists == FalseImportant Note: Make sure to maintain the correct indentation when copying and pasting content. Incorrect indentation will lead to errors in execution!!
Your mysql_install/tasks/main.yml file should look like this (below) so far:
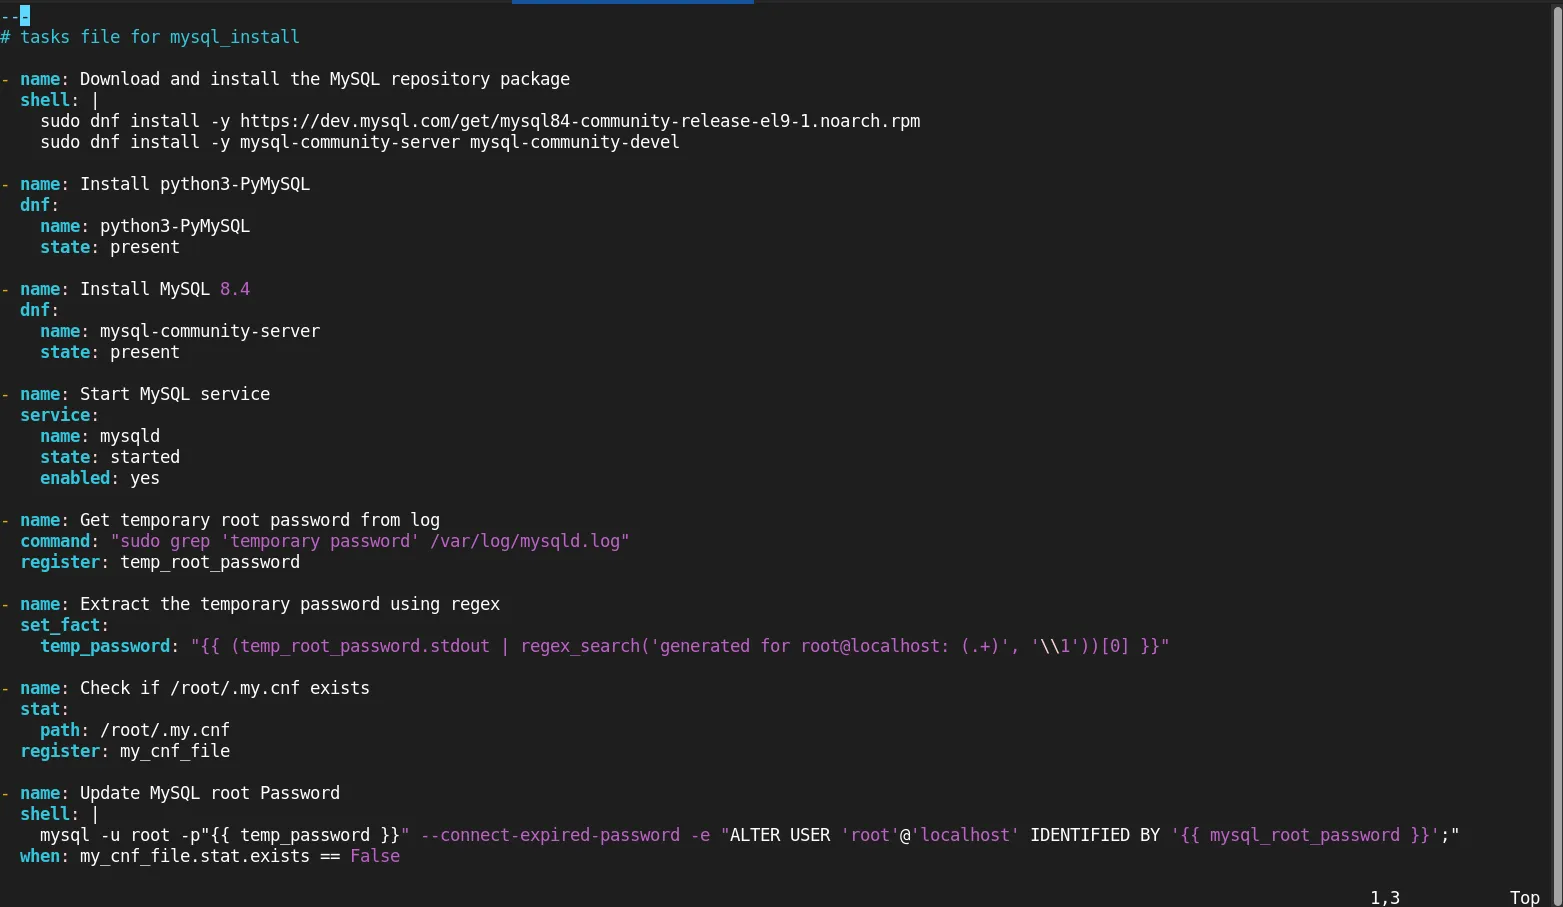
Photo by admingeek from Infotechys
Step 2: Configuring MySQL
After MySQL 8.4 is installed, you need to configure it. Here are the tasks for configuring MySQL in your role:
Creating Configuration Files for MySQL |
Create a configuration file (/etc/my.cnf) in the files/ directory of your role if you need to customize MySQL’s settings.
For example, here’s a basic my.cnf template:
vim mysql_install/files/my.cnf[mysqld]
bind-address = 0.0.0.0
sql_mode=STRICT_TRANS_TABLES,NO_ENGINE_SUBSTITUTION
# Enable mysql_native_password plugin
mysql_native_password=ONThis configuration ensures MySQL listens on all interfaces, enforces strict SQL standards, and enables compatibility for older authentication methods.
| Configuration | Description |
|---|---|
bind-address = 0.0.0.0 | Makes MySQL listen for connections on all available network interfaces, allowing remote access from any IP address. This could pose a security risk if not properly secured. |
sql_mode = STRICT_TRANS_TABLES,NO_ENGINE_SUBSTITUTION | Sets SQL modes for MySQL: <ul><li>STRICT_TRANS_TABLES: Enforces strict validation for transactional tables, causing errors on invalid or missing values.</li><li>NO_ENGINE_SUBSTITUTION: Prevents MySQL from using an alternative engine if the requested engine is unavailable.</li></ul> |
mysql_native_password = ON | Enables the mysql_native_password authentication plugin, which is commonly used for compatibility and is necessary for certain MySQL clients or older versions to authenticate. |
Let’s reference this file in your role’s tasks/main.yml to copy the configuration to the target server:
vim mysql_install/tasks/main.yml- name: Copy custom MySQL configuration file
copy:
src: my.cnf
dest: /etc/my.cnf
owner: root
group: root
mode: '0644'Additionally, include an entry to create a /root/.my.cnf file that stores the MySQL root password.
- name: Create the MySQL (/root/.my.cnf) config file
copy:
  dest: /root/.my.cnf
  content: |
    [client]
    user=root
password={{ mysql_root_password }}Restart the database to allow changes to take effect.
- name: Restart MySQL service
service:
  name: mysqld
  state: restarted
enabled: yesSetting Up MySQL Users and Databases |
In the tasks/main.yml, you can also include tasks to create users and databases:
- name: Create MySQL database
  community.mysql.mysql_db:
    name: "{{ mysql_database }}"
    state: present
    login_user: root
    login_password: "{{ mysql_root_password }}"


- name: Create MySQL user
  community.mysql.mysql_user:
    name: "{{ mysql_username }}"
    password: "{{ mysql_user_password }}"
    priv: "{{ mysql_database }}.*:ALL"
    state: present
    login_user: root
login_password: "{{ mysql_root_password }}"Step 3: Starting and Enabling MySQL
Once MySQL is installed and configured, ensure that the service is started and enabled to start on boot. In the handlers/main.yml file, create a handler to restart MySQL if any changes occur.
vim mysql_install/handlers/main.yml---
# handlers file for mysql_install
- name: Start MySQL service
service:
name: mysqld
state: started
enabled: yesThis task ensures that MySQL starts and is enabled to start on reboot.
Step 4: Create test Inventory
Before running the playbook, let’s define the host or hosts for the test run. In the tests/inventory file, specify the target host(s). In this example, we’ve included the IP address of our CentOS 9 server (mysql-db.dev.naijalabs.net).
vim mysql_install/tests/inventory[mysql_database_server]
192.168.1.219 ansible_ssh_user=adminStep 5: Create and run the playbook
Finally, we can create a mysql_db_install.yml file in the role’s root directory. Your directory structure should now include the following:
.
├── mysql_db_install.yml
├── mysql_install
│   ├── defaults
│   │   └── main.yml
│   ├── files
│   │   └── my.cnf
│   ├── handlers
│   │   └── main.yml
│   ├── meta
│   │   └── main.yml
│   ├── README.md
│   ├── tasks
│   │   └── main.yml
│   ├── templates
│   ├── tests
│   │   ├── inventory
│   │   └── test.yml
│   └── vars
│       ├── main.yml
│       └── secrets.yml
└── vaultpass

9 directories, 12 files
Open the mysql_db_install.yml file and add the following content:
vim mysql_db_install.yml---
- name: Install MySQL 8.4 Database on CentOS 9
hosts: mysql_database_server
vars_files:
- mysql_install/vars/secrets.yml
become: true
roles:
- mysql_installRun the following command to execute the playbook:
ansible-playbook -i mysql_install/tests/inventory mysql_db_install.yml -K --vault-password-file .vaultpassWhen the playbook is finished running, you should have an operational MySQL Database!
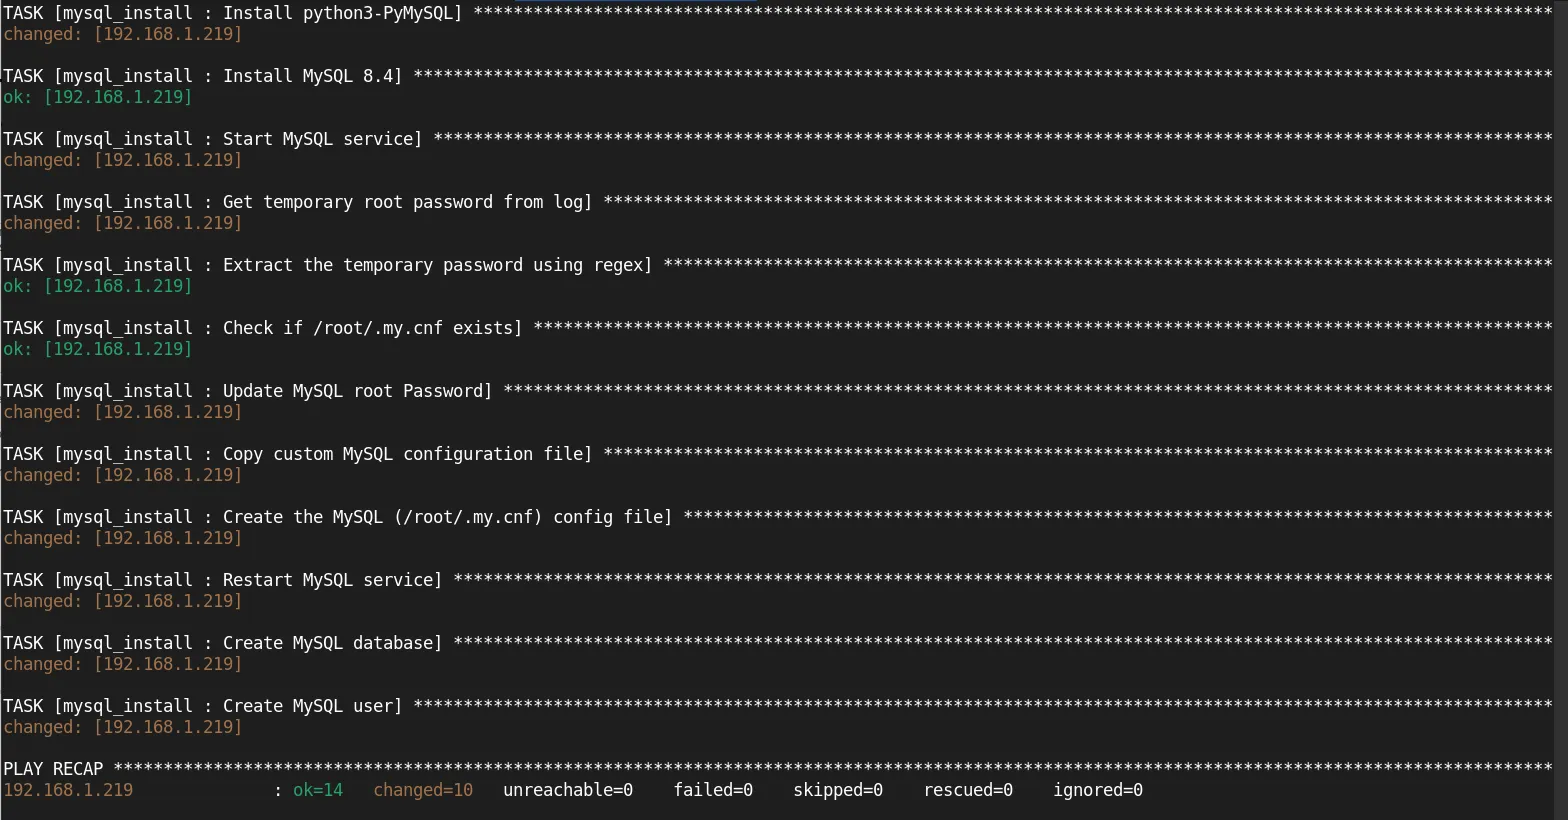
Photo by admingeek from Infotechys
Step 6: Verify and Test MySQL Installation
After running the Ansible role to install and configure MySQL, it’s important to test the installation to ensure everything is working correctly. Use the following command to check MySQL’s status:
systemctl status mysqld● mysqld.service - MySQL Server
Loaded: loaded (/usr/lib/systemd/system/mysqld.service; enabled; preset: disabled)
Active: active (running) since Tue 2025-02-04 03:26:28 EST; 49s ago
Docs: man:mysqld(8)
http://dev.mysql.com/doc/refman/en/using-systemd.html
Process: 10088 ExecStartPre=/usr/bin/mysqld_pre_systemd (code=exited, status=0/SUCCESS)
Main PID: 10115 (mysqld)
Status: "Server is operational"
Tasks: 36 (limit: 23127)
Memory: 433.8M
CPU: 37.367s
CGroup: /system.slice/mysqld.service
└─10115 /usr/sbin/mysqldYou can also test logging into MySQL:
sudo mysql -u root -pEnter password:
Welcome to the MySQL monitor. Commands end with ; or \g.
Your MySQL connection id is 10
Server version: 8.4.4 MySQL Community Server - GPL
Copyright (c) 2000, 2025, Oracle and/or its affiliates.
Oracle is a registered trademark of Oracle Corporation and/or its
affiliates. Other names may be trademarks of their respective
owners.
Type 'help;' or '\h' for help. Type '\c' to clear the current input statement.
mysql>Run the following command to show the default databases and confirm your database was created:
SHOW DATABASES;+--------------------+
| Database |
+--------------------+
| information_schema |
| my_database |
| mysql |
| performance_schema |
| sys |
+--------------------+
5 rows in set (0.00 sec)
Best Practices for Managing MySQL Using Ansible Roles
To ensure a clean and efficient deployment of MySQL, here are a few best practices:
| Best Practice | Explanation |
|---|---|
| Use Configuration Management | Always store configuration files (e.g., my.cnf) in version-controlled systems. |
| Ensure Idempotency | Make sure your playbooks and roles are idempotent, i.e., they should work even if run multiple times. |
| Use Variables for Passwords | Avoid hardcoding sensitive information like passwords. Use Ansible vault to store secrets securely. |
| Regularly Update MySQL | Keep MySQL up to date to ensure security patches and new features are installed. |
Troubleshooting Common Issues
Here are some common issues you might encounter:
- MySQL service fails to start: This could be due to incorrect configuration or missing dependencies. Check the logs at
/var/log/mysqld.logfor more information. - Package installation fails: Ensure the MySQL repository is correctly added and accessible.
- Permission denied when creating databases or users: Verify that the MySQL root password is correct and the Ansible user has the necessary privileges.


No comments:
Post a Comment