Introduction |
Cluster SSH (CSSH) is an invaluable tool for system administrators who manage multiple servers simultaneously. It allows you to control multiple SSH sessions in parallel, making it easier to execute commands across a cluster of machines. In this guide, we will walk you through the step-by-step process of installing Cluster SSH on various Linux distributions, including Ubuntu, Debian, CentOS, and Fedora. Whether you are a seasoned sysadmin or a beginner, this tutorial will help you get up and running quickly. Let’s dive in!
Why Use Cluster SSH? |
Cluster SSH is designed to streamline the management of multiple servers. It opens several terminal windows, one for each server, and a master window where you can type commands to be sent to all servers simultaneously. This tool is especially useful for tasks such as software updates, configuration changes, and monitoring.
Key Features of Cluster SSH |
- Simultaneous Command Execution: Run commands across multiple servers at once.
- Efficiency: Save time by avoiding repetitive SSH connections.
- Consistency: Ensure all servers receive the same commands and updates.
- Control: Easily manage a large number of servers from a single interface.
Prerequisites |
Before you begin the installation, ensure you have the following:
- A system running a supported Linux distribution.
- Administrative privileges (root or sudo access).
- SSH access to the servers you wish to manage.
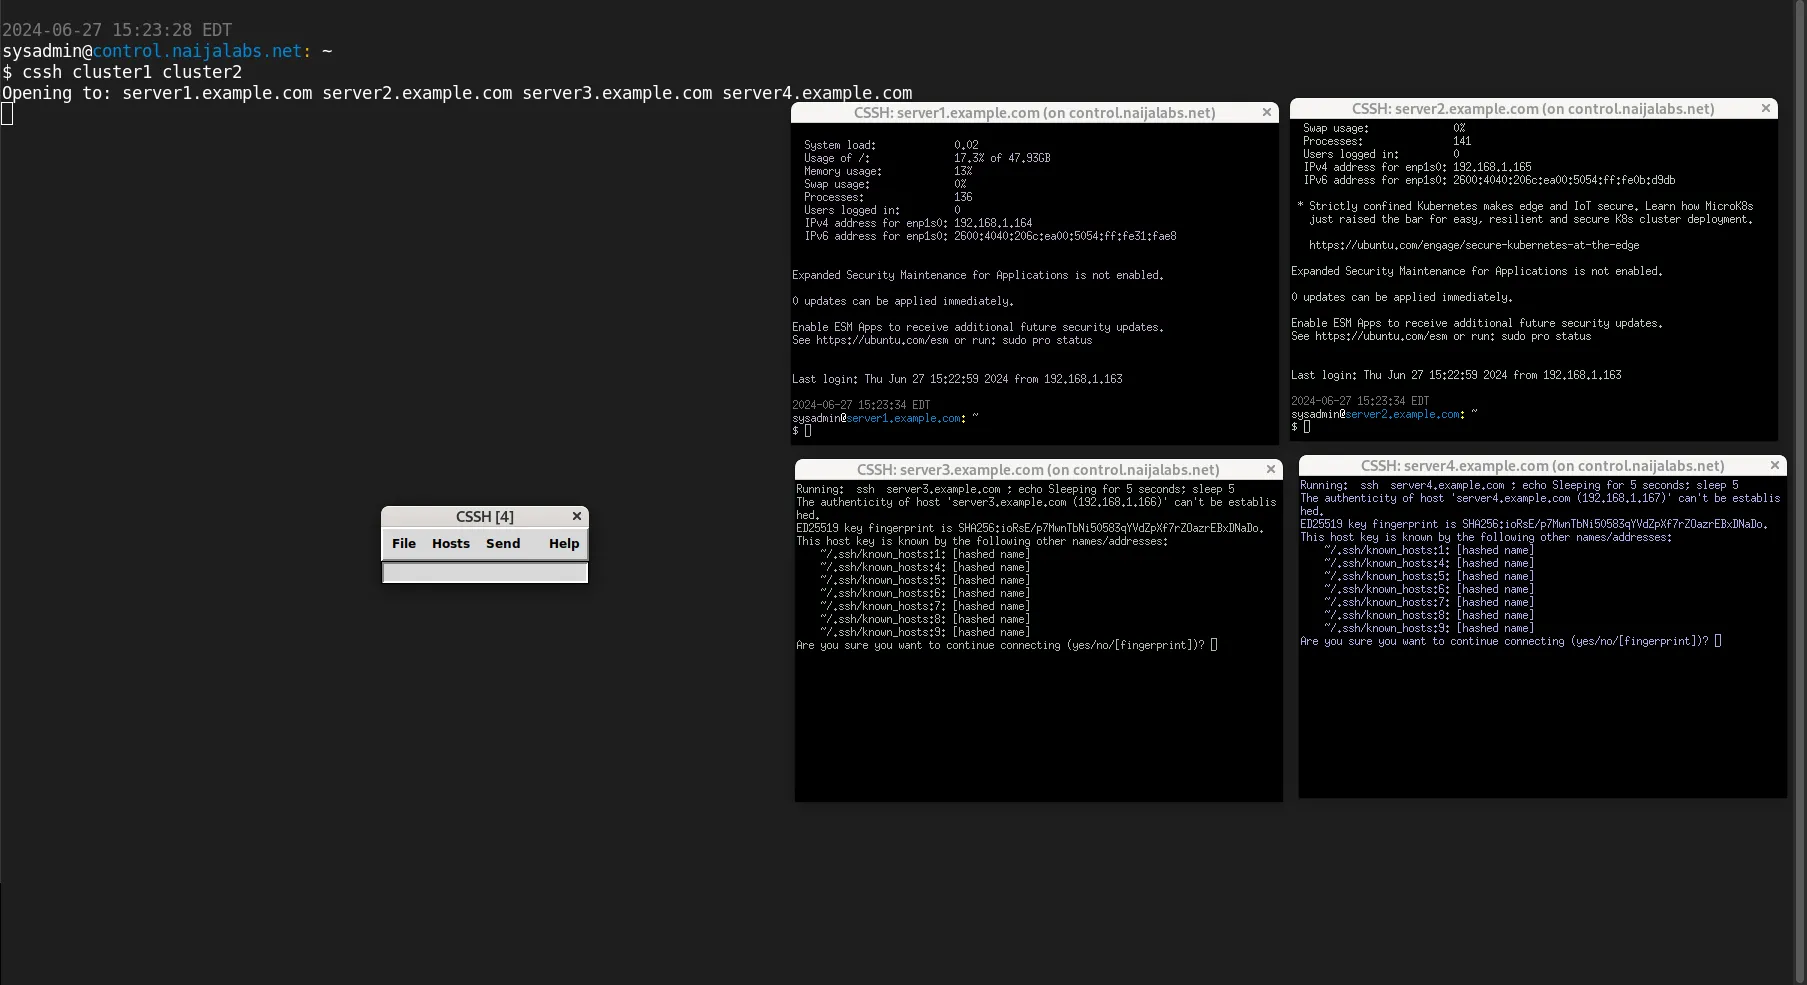
Photo by admingeek from Infotechys
Install Cluster SSH on Linux: Ubuntu or Debian
Step 1: Update Your System |
It’s essential to start with an updated system to avoid compatibility issues. Open your terminal and run:
sudo apt update && sudo apt upgrade -y # On Ubuntu and Debian MachinesThis command will update the package list and upgrade all installed packages to their latest versions.
Step 2: Install Cluster SSH |
Cluster SSH is available in the default Ubuntu and Debian repositories, making the installation straightforward. To install Cluster SSH, use the following command:
sudo apt install clusterssh -yVerify the Installation |
To ensure Cluster SSH is installed correctly, check the version:
cssh --versionVersion: 4.16Install Cluster SSH on Linux: RHEL, CentOS and Fedora
Step 1: Update Your System |
Updating your system is crucial to ensure all packages are current. Open your terminal and run:
sudo yum update -y # RHEL/CentOS 7 Machinessudo dnf update -y # RHEL/CentOS 8+ and Fedora MachinesStep 2: Install EPEL Repository |
Cluster SSH is available in the EPEL (Extra Packages for Enterprise Linux) repository. Install EPEL with the following commands:
sudo yum install epel-release -y # For CentOSsudo dnf install epel-release -y # For Fedorasudo yum install https://dl.fedoraproject.org/pub/epel/epel-release-latest-7.noarch.rpm # RHEL 7sudo dnf install https://dl.fedoraproject.org/pub/epel/epel-release-latest-8.noarch.rpm # RHEL 8sudo dnf install https://dl.fedoraproject.org/pub/epel/epel-release-latest-9.noarch.rpm # RHEL 9💡During the EPEL install process, you may encounter the following message (below):
Many EPEL packages require the CodeReady Builder (CRB) repository.
It is recommended that you run /usr/bin/crb enable to enable the CRB repository.
Enable the CodeReady Builder (CRB) repository with the following command:
sudo /usr/bin/crb enableStep 3: Install Cluster SSH |
Once EPEL is enabled, install Cluster SSH using:
sudo yum install clusterssh -y # RHEL 7sudo dnf install clusterssh -y # RHEL 8 or higherRun the cssh --version command to verify the install.
Configuring Cluster SSH |
After installation, the next step is configuring Cluster SSH to connect to your servers. The configuration file is located in your home directory:
~/.csshrcExample Configuration |
Here’s an example of how to configure your .csshrc file (Using your preferred text editor, open the .csshrc file and copy and paste the following below):
clusters = cluster1 cluster2

cluster1 = server1.example.com server2.example.com
cluster2 = server3.example.com server4.example.comIn this example, cluster1 includes server1.example.com and server2.example.com, while cluster2 includes server3.example.com and server4.example.com. You can add as many clusters and servers as needed.
You can replace clusters 1 & 2 and the servernames with the names of machines in your environment.
Using Cluster SSH |
To use Cluster SSH, simply run the cssh command followed by the cluster name:
cssh cluster1This command will open separate terminal windows for server1.example.com and server2.example.com, along with a master window (shown below) where you can type commands.
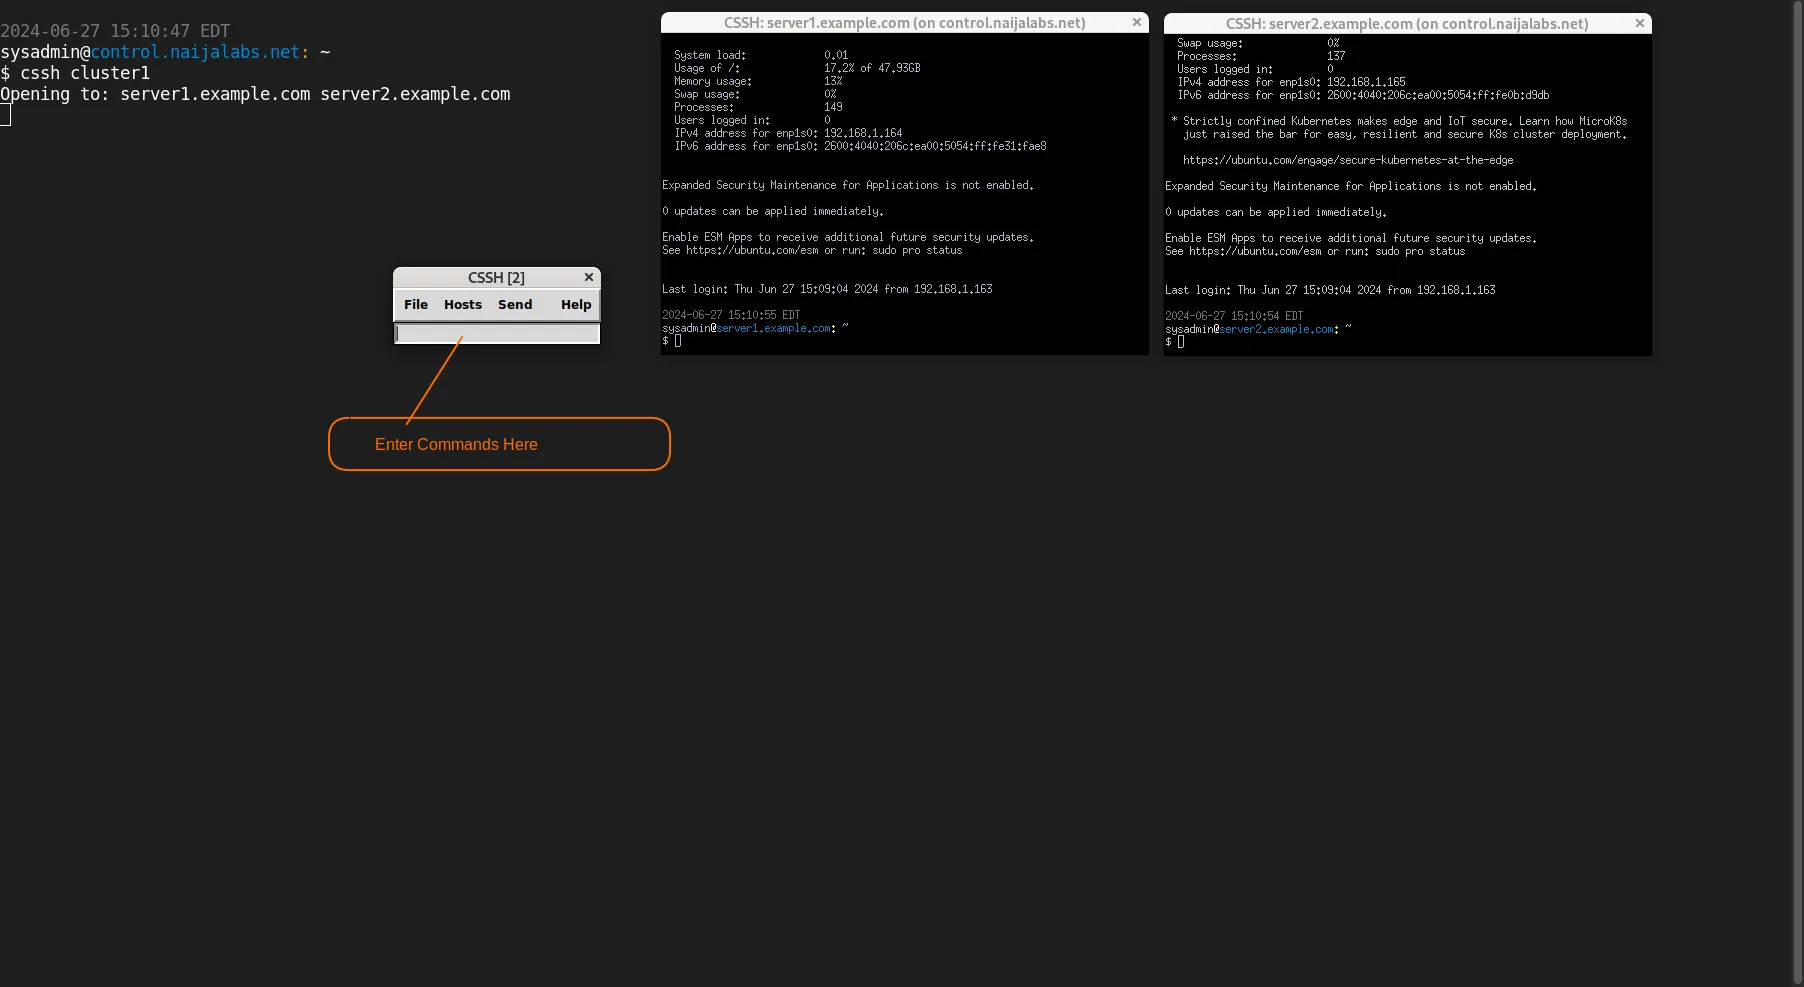
Photo by admingeek from Infotechys
Example Usage |
Let’s say you want to update the package list on all servers in cluster1. Open Cluster SSH with:
cssh cluster1In the master window, type:
cssh cluster1This command will execute on all servers within cluster1, updating the package list simultaneously.
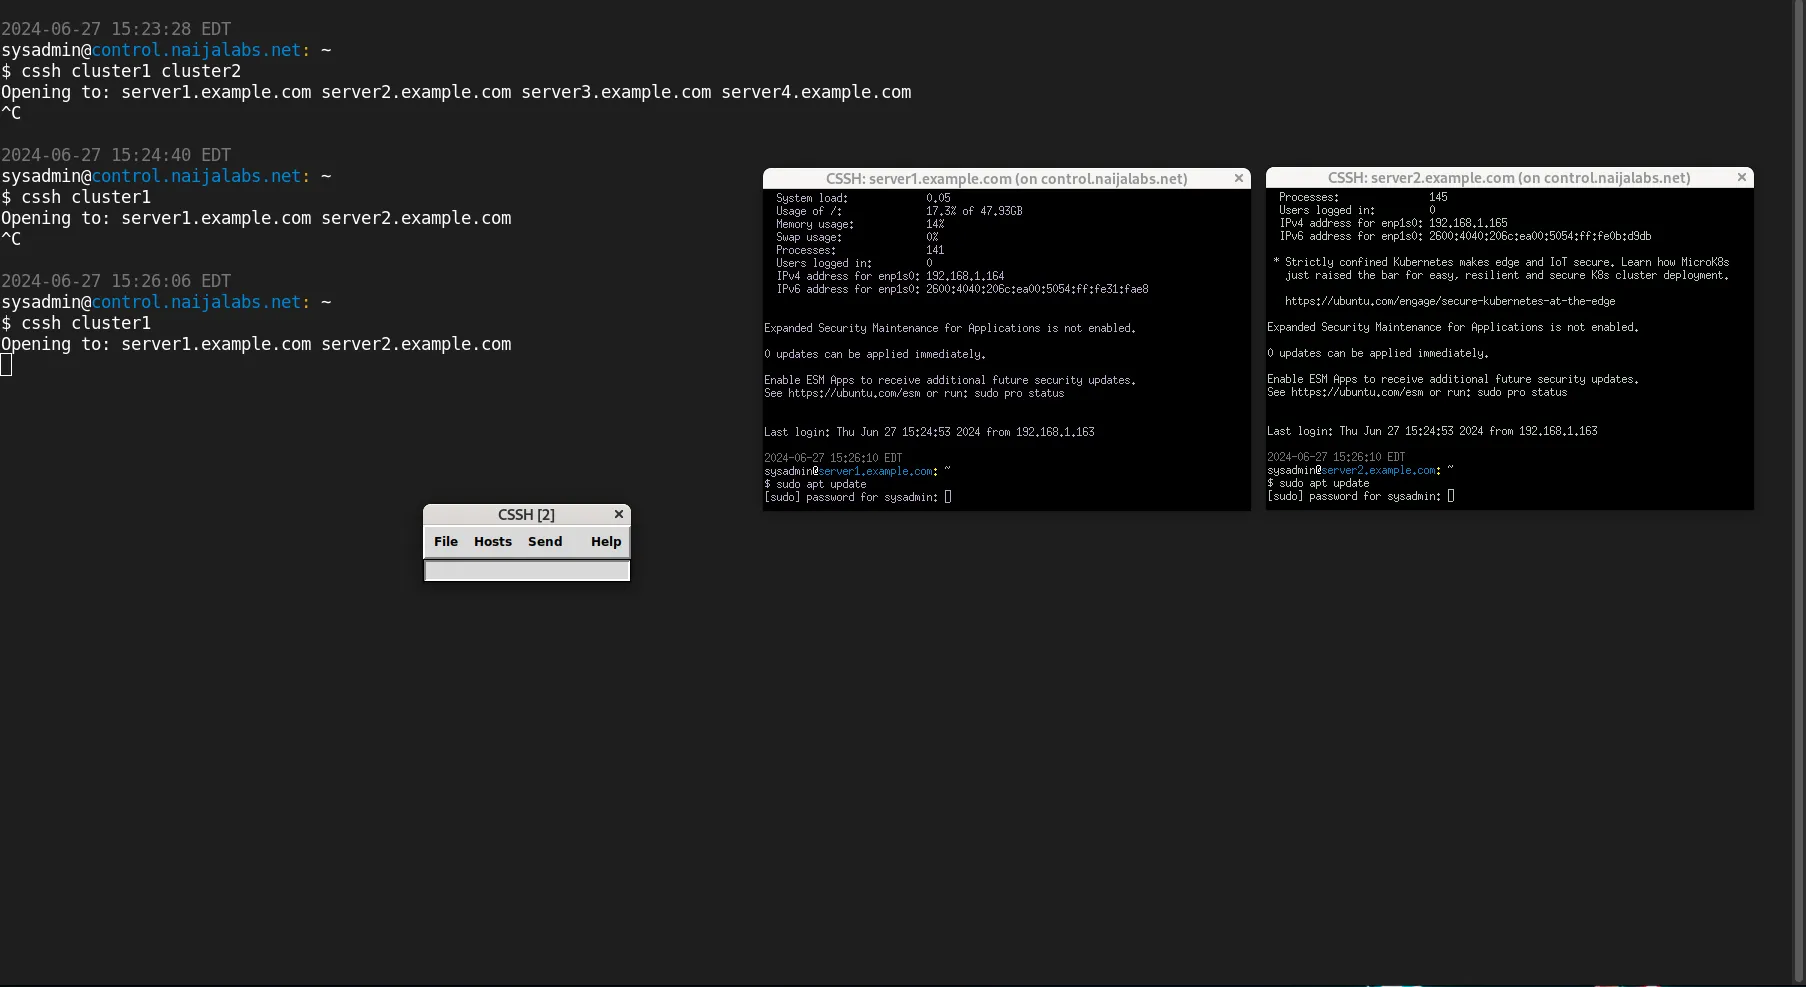
Photo by admingeek from Infotechys
Troubleshooting Cluster SSH
Common Issues |
- SSH Authentication: Ensure you have SSH keys set up for passwordless login, as repeatedly entering passwords can be cumbersome.
- Network Connectivity: Verify that all servers are reachable and there are no network issues.
- Permissions: Make sure you have the necessary permissions to execute commands on the servers.
Checking SSH Connections |
If you encounter issues, check your SSH connections individually:
ssh user@server1.example.comEnsure each server in your cluster is accessible.
Advanced Configuration
For more advanced usage, you can customize your .csshrc file further. Here’s an example with additional options:
Customizing Terminal Behavior |
Cluster SSH does not directly support settings like auto-closing windows or setting terminal fonts via the .csshrc file. However, you can achieve similar customization using other methods depending on your terminal emulator and personal scripts.
Auto-Closing Terminal Windows |
To auto-close terminal windows after commands complete, you might need to adjust your terminal emulator settings or use a script. For example, you can use a wrapper script to close terminals after execution:
#!/bin/bash
cssh "$@"
for pid in $(pgrep -f "ssh -X"); do
  wait $pid
  kill $pid
doneSave this script as cssh_wrapper.sh, make it executable, and run it instead of cssh:
chmod +x cssh_wrapper.sh./cssh_wrapper.sh cluster1Summary Table
| Step | Command (Ubuntu/Debian) | Command (CentOS/Fedora) |
|---|---|---|
| Update System | sudo apt update && sudo apt upgrade -y | sudo yum update -y (CentOS) / sudo dnf update -y (Fedora) |
| Install Cluster SSH | sudo apt install clusterssh -y | sudo yum install clusterssh -y (CentOS) / sudo dnf install clusterssh -y (Fedora or RHEL/CentOS 8+) |
| Verify Installation | cssh --version | cssh --version |
| Configure | Edit ~/.csshrc with server details | Edit ~/.csshrc with server details |
| Run Cluster SSH | cssh cluster1 | cssh cluster1 |
Tips for Effective Use
|
By mastering Cluster SSH, you’ll be able to manage large server clusters more efficiently, saving time and reducing the risk of human error. Happy clustering!


No comments:
Post a Comment